mNo edit summary Tags: Visual edit apiedit |
mNo edit summary Tags: Visual edit apiedit |
||
| Line 1: | Line 1: | ||
| − | |||
| − | [Under Construction] |
||
Welcome to the Urho3D beginner build guide! |
Welcome to the Urho3D beginner build guide! |
||
| Line 65: | Line 63: | ||
If you also build the samples you can find them in your Build/bin: |
If you also build the samples you can find them in your Build/bin: |
||
| + | [[File:Urho sample.jpg|centre|thumb|600x600px]] |
||
| − | |||
You may want to continue with the [[First Project|first project]] tutorial. |
You may want to continue with the [[First Project|first project]] tutorial. |
||
Revision as of 06:55, 8 December 2015
Welcome to the Urho3D beginner build guide!
This Guide describes how to create and build Urho3D from source.
This guide is based on the official build guide (http://urho3d.github.io/documentation/1.5/_building.html) but provides a more complete guide (with dependencies) and is a step by step guide with images, which should be easier for beginners. This guide uses Windows and CodeBlocks as an IDE with the MinGW compiler suite (GCC), but other systems and combinations are quite similar.
There are also older guides for Urho 1.4 and Urho 1.32, the later one uses Makefiles.
This guide uses the following programs (links below):
- Urho3D (1.5)
- CMake (3.4.1, this is the build system used by Urho)
- MinGW64 (5.2.0 64bit)
- CodeBlocks (15.12 RC1, the IDE this guide uses, you could also use something else)
- Windows 10 (64bit, there should be no difference compared to Windows 7 and 8)
- Optional: DirectX SDK (only required if you want to use DirectX 9 or 11 instead of OpenGL)
Other program versions should work too and other programs (like Visual Studio instead of MinGW) are similiar.
1. Download and Installation Edit
- Urho3D (source): http://sourceforge.net/projects/urho3d/files/Urho3D/1.5/Urho3D-1.5-Source.zip/download
- CMake: http://www.cmake.org/download/ (direct link to setup: https://cmake.org/files/v3.4/cmake-3.4.1-win32-x86.exe)
- MinGW64: http://sourceforge.net/projects/mingw-w64/?source=typ_redirect
- CodeBlocks: http://forums.codeblocks.org/index.php/topic,20729.0.html (there's also a Codeblocks bundled with MinGW but that MinGW doesn't work properly, just get Codeblocks)
- Optional: DirectX SDK https://www.microsoft.com/en-us/download/details.aspx?id=6812
When installing CMake, select one of the two options to add it to the system PATH:

All other programs can be installed with default settings. Unpack Urho somewhere.
2. Setup Codeblocks
For me Codeblocks couldn't automatically find the compiler so I had to specify it manually:
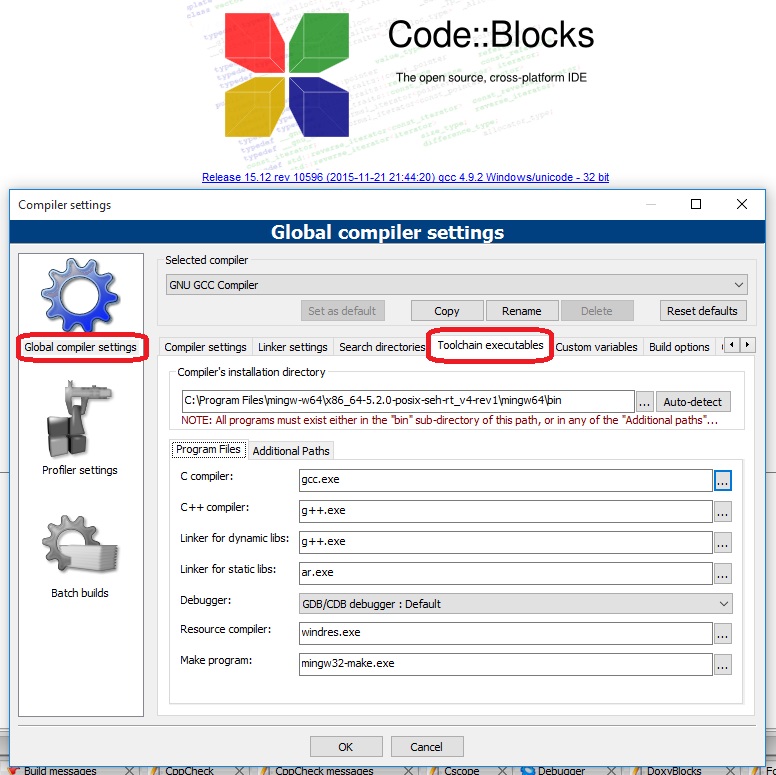
- Go to "Settings" (in menu bar) -> "Compiler"
- "Global compiler settings" -> "Toolchain executable"
- Select the path of MinGW's /bin and change the program names to match the one there.
3. Set up MinGW for CMake
You have to modify your system path so that Urho's CMake scripts can find your MinGW:

- Open an explorer window and right click on "This PC".
- -> Properties
- -> Advanced System Settings
- -> Environment Variables
- Select "Path"
- -> Edit
- Copy the path to where you installed MinGW. You need the /bin subdirectory. (you can click in and copy from the marked address bar)
- Enter a ; and paste the path. (Entries in this list are seperated by semicolons.)
- Click Ok everywhere.
4. Run CMake to create the project files for Urho


- Go to where you have unpacked Urho
- Click "File"->"Open command prompt" or press Shift+Rightclick somewhere in the folder or Shift+F10 to open a menu with the "Open command window here" option. This opens a terminal.
- Start the "cmake_codeblocks.bat" script with a folder name as a parameter (doesn't have to exist) where you want to create the project files. This folder can also be outside of the Urho folder.
You can also set build options for Urho when executing the script, for example:
cmake_codeblocks.bat Build -DURHO3D_OPENGL=0 -DURHO3D_WIN32_CONSOLE=1
This builds Urho with DirectX9 instead of OpenGL (default) and with the console option (displays logging in a terminal when using the samples). See http://urho3d.github.io/documentation/1.5/_building.html for all options.
5. Building Urho
- Open the project that that the script just created in the build folder (here "Build/Urho3D.cbp").
- Use Ctrl+F9 or the gear-wheel symbol to build Urho. This takes a while and prints a lot to the build log:


Finished!
If you also build the samples you can find them in your Build/bin:


You may want to continue with the first project tutorial.