(Added snippet about using the terrain with four splatting textures.) Tags: Visual edit apiedit |
(Typo) Tags: Visual edit apiedit |
||
| (27 intermediate revisions by 2 users not shown) | |||
| Line 1: | Line 1: | ||
| + | == How to write text into console == |
||
| − | == Customize materials per code & different materials per model == |
||
| + | Urho implements its own functions for writing text (logging) into console. If you want to use them, first you need to include Log.h |
||
| − | Normally you assign materials like this: |
||
| + | #include "Urho3D/IO/Log.h" |
||
| + | Writing info messages: |
||
| + | LOGINFO(text); |
||
| + | Writing debug messages: |
||
| + | LOGDEBUG(text); |
||
| + | Writing error messages: |
||
| + | LOGERROR(text); |
||
| + | == Creating and using your own subsystems == |
||
| − | <syntaxhighlight lang="cpp"> |
||
| + | If you have a class inherited from Urho's Object class, you can create a subsystem out of it. The subsystems are helpful, for example, when you want to make a class instance available to every other class inheriting from Object. In this HowTo I will create a subsystem of a class called Settings. |
||
| − | StaticModel* boxObject=boxNode_->CreateComponent<StaticModel>(); |
||
| − | boxObject->SetModel(cache->GetResource<Model>("Models/Box.mdl")); |
||
| − | boxObject->SetMaterial(cache->GetResource<Material>("Materials/Stone.xml")); |
||
| − | </syntaxhighlight> |
||
| − | You can also load materials, copy them, and/or change parameters: |
||
| + | First things to note in subsystem creation (this text is copied from the [https://urho3d.github.io/documentation/1.32/_subsystems.html Urho documentation]): |
||
| − | <syntaxhighlight lang="cpp"> |
||
| − | Material* mat1=cache->GetResource<Material>("Materials/Stone.xml"); |
||
| − | auto mat2=mat1->Clone(); // copy material |
||
| − | // change the ciffuse color |
||
| − | mat2->SetShaderParameter("MatDiffColor",Color(0.1,0.4,0.9)); |
||
| − | boxObject->SetMaterial(mat2); |
||
| − | </syntaxhighlight> |
||
| − | You can use this to make every model unique by randomizing colors or color models in a team color. You can also pass custom parameters to control things like current weather or different (localized) lighting scenes. |
||
| + | Any Object can be registered to the Context as a subsystem, by using the function RegisterSubsystem(). They can then be accessed by any other Object inside the same context by calling GetSubsystem(). Only one instance of each object type can exist as a subsystem. |
||
| − | An example of 400 uniquely colored cubes: |
||
| ⚫ | |||
| + | So, we can create our own subsystem in just a few steps: |
||
| − | == Expand default terrain material to 4 textures using alpha channel == |
||
| − | Add another texture to the terrain material "Data/Materials/Terrain.xml" like: |
||
| − | <material><br> |
||
| − | <technique name="Techniques/TerrainBlend.xml" /><br> |
||
| − | <texture unit="0" name="Textures/TerrainWeights.png" /><br> |
||
| − | <texture unit="1" name="Textures/TerrainDetail1.dds" /><br> |
||
| − | <texture unit="2" name="Textures/TerrainDetail2.dds" /><br> |
||
| − | <texture unit="3" name="Textures/TerrainDetail3.dds" /><br> |
||
| − | <texture unit="4" name="Textures/StoneDiffuse.dds" /><br> |
||
| − | <parameter name="MatSpecColor" value="0.5 0.5 0.5 16" /><br> |
||
| − | <parameter name="DetailTiling" value="16 16" /><br> |
||
| − | </material> |
||
| − | For OpenGL: Change the "CoreData/Shaders/GLSL/TerrainBlend.glsl" to additionally use the alpha channel: |
||
| − | ... |
||
| − | uniform sampler2D sWeightMap0;<br> |
||
| − | uniform sampler2D sDetailMap1;<br> |
||
| − | uniform sampler2D sDetailMap2;<br> |
||
| − | uniform sampler2D sDetailMap3;<br> |
||
| − | uniform sampler2D sDetailMap4; // <- added |
||
| − | ... |
||
| − | void PS()<br> |
||
| − | {<br> |
||
| − | // Get material diffuse albedo<br> |
||
| − | vec4 weights = texture2D(sWeightMap0, vTexCoord).rgba; // <- changed<br> |
||
| − | weights.a=1.0-weights.a; // <- added. Alpha should be weight in reverse (easier editing) |
||
| − | // with 0 (fully transparent) being full weight.<br> |
||
| − | float sumWeights = weights.r + weights.g + weights.b + weights.a; // <- changed<br> |
||
| − | weights /= sumWeights;<br> |
||
| − | vec4 diffColor = cMatDiffColor * (<br> |
||
| − | weights.r * texture2D(sDetailMap1, vDetailTexCoord) +<br> |
||
| − | weights.g * texture2D(sDetailMap2, vDetailTexCoord) + <br> |
||
| − | weights.b * texture2D(sDetailMap3, vDetailTexCoord) + // <- changed<br> |
||
| − | weights.a * texture2D(sDetailMap4, vDetailTexCoord) // <- added<br> |
||
| − | ); |
||
| − | ... |
||
| − | If you want to use DirectX, also change the HLSL accordingly. |
||
| + | 1. Create an instance of your desired class inheriting from Object. I'm using a class called Settings: |
||
| − | Use another splatting image (watch out for high red/green/blue values inside the alpha, it should be black with high alpha). My texture weight image and the result look like this: |
||
| + | Settings* gs = new Settings(context_); |
||
| − | [[File:Rgba terrain.jpg|centre|thumb|730x730px]] |
||
| + | 2. Register it to the Context: |
||
| + | context_->RegisterSubsystem(gs); |
||
| + | So now we have created our own subsystem. We can now use it from any Object class we want by using GetSubsystem<NameOfSubsystem>() |
||
| + | |||
| + | Settings* settings = context_->GetSubsystem<Settings>(); |
||
| + | |||
| + | == How To Enable Post Process Effects == |
||
| + | Urho comes with several post process effects (screen effects). Some are listed here: http://urho3d.prophpbb.com/topic55.html |
||
| + | |||
| + | You can enable them like this: |
||
| + | RenderPath* effectRenderPath=viewport->GetRenderPath();<br>effectRenderPath->Append(cache->GetResource<XMLFile>("PostProcess/AutoExposure.xml"));<br>effectRenderPath->Append(cache->GetResource<XMLFile>("PostProcess/BloomHDR.xml"));<br>effectRenderPath->Append(cache->GetResource<XMLFile>("PostProcess/FXAA2.xml")); |
||
| + | The linked forum post uses the Clone() function, that crashed when I use it and just appending the effect to the current RenderPath works too. |
||
| + | |||
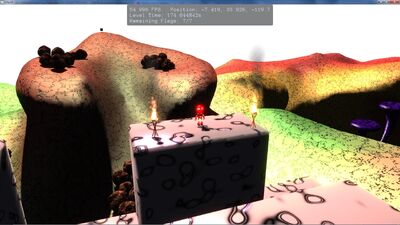
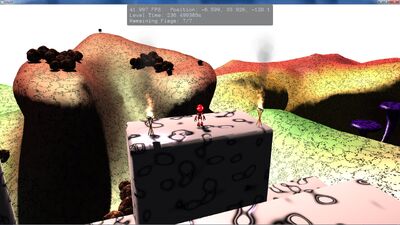
| + | The difference between the three effects being appended and not: (I configured the effects to be stronger as per default in their .xml so they may be different if you try it.) |
||
| + | [[File:Postprocess effects on.jpg|left|thumb|400x400px]] |
||
| ⚫ | |||
Latest revision as of 01:42, 8 February 2016
How to write text into console[]
Urho implements its own functions for writing text (logging) into console. If you want to use them, first you need to include Log.h
#include "Urho3D/IO/Log.h"
Writing info messages:
LOGINFO(text);
Writing debug messages:
LOGDEBUG(text);
Writing error messages:
LOGERROR(text);
Creating and using your own subsystems[]
If you have a class inherited from Urho's Object class, you can create a subsystem out of it. The subsystems are helpful, for example, when you want to make a class instance available to every other class inheriting from Object. In this HowTo I will create a subsystem of a class called Settings.
First things to note in subsystem creation (this text is copied from the Urho documentation):
Any Object can be registered to the Context as a subsystem, by using the function RegisterSubsystem(). They can then be accessed by any other Object inside the same context by calling GetSubsystem(). Only one instance of each object type can exist as a subsystem.
So, we can create our own subsystem in just a few steps:
1. Create an instance of your desired class inheriting from Object. I'm using a class called Settings:
Settings* gs = new Settings(context_);
2. Register it to the Context:
context_->RegisterSubsystem(gs);
So now we have created our own subsystem. We can now use it from any Object class we want by using GetSubsystem<NameOfSubsystem>()
Settings* settings = context_->GetSubsystem<Settings>();
How To Enable Post Process Effects[]
Urho comes with several post process effects (screen effects). Some are listed here: http://urho3d.prophpbb.com/topic55.html
You can enable them like this:
RenderPath* effectRenderPath=viewport->GetRenderPath();
effectRenderPath->Append(cache->GetResource<XMLFile>("PostProcess/AutoExposure.xml"));
effectRenderPath->Append(cache->GetResource<XMLFile>("PostProcess/BloomHDR.xml"));
effectRenderPath->Append(cache->GetResource<XMLFile>("PostProcess/FXAA2.xml"));
The linked forum post uses the Clone() function, that crashed when I use it and just appending the effect to the current RenderPath works too.
The difference between the three effects being appended and not: (I configured the effects to be stronger as per default in their .xml so they may be different if you try it.)

