m (→Urho3D Techniques:
Typo) Tags: Visual edit apiedit |
m (→Appearance in Urho3D:
Typo) Tags: Visual edit apiedit |
||
| (8 intermediate revisions by 2 users not shown) | |||
| Line 8: | Line 8: | ||
=== Diffuse Map === |
=== Diffuse Map === |
||
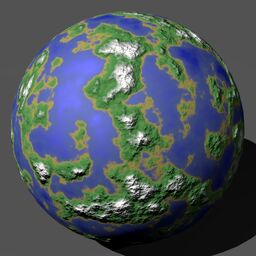
A diffuse map is a typical texture (image) which modifies the color of the surface: |
A diffuse map is a typical texture (image) which modifies the color of the surface: |
||
| − | [[File:Shader d.jpg|centre|thumb|256x256px]] |
+ | [[File:Shader d-0.jpg|centre|thumb|256x256px]] |
=== Normal Map === |
=== Normal Map === |
||
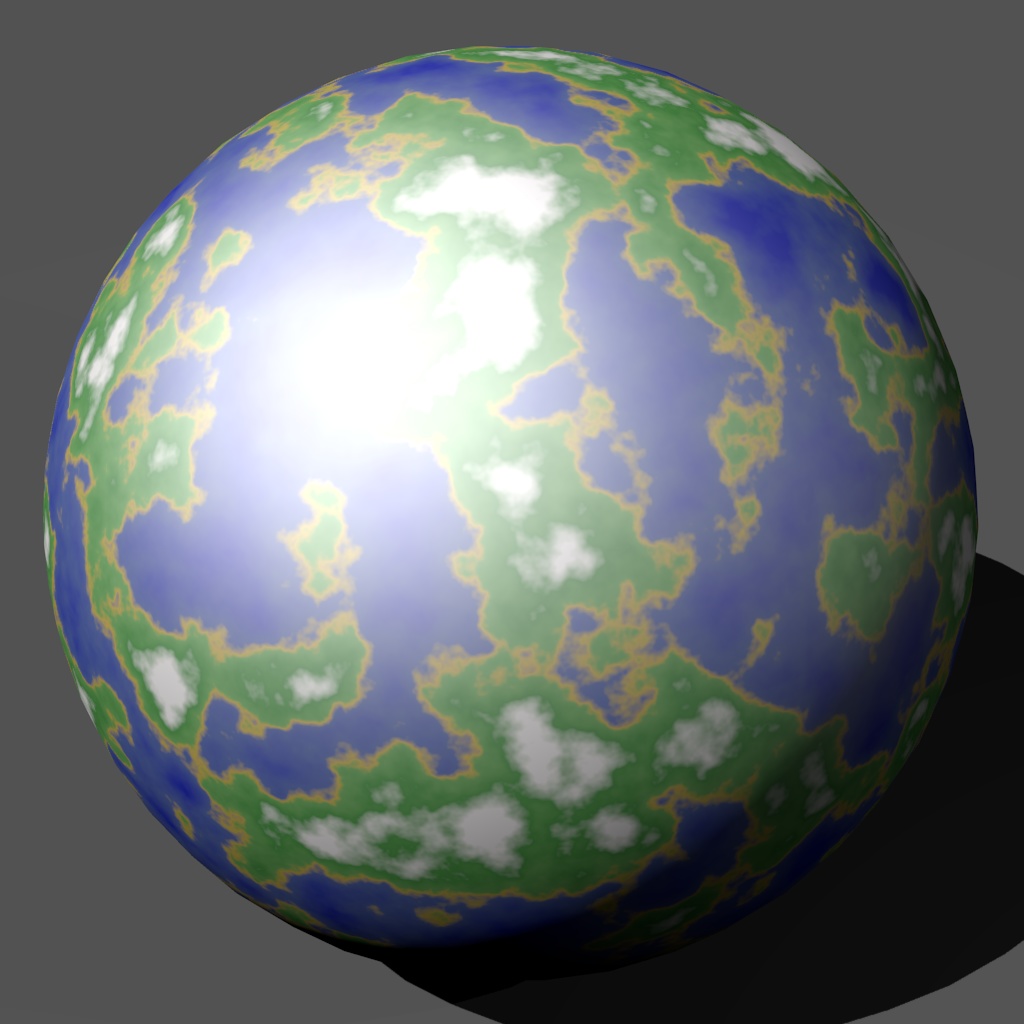
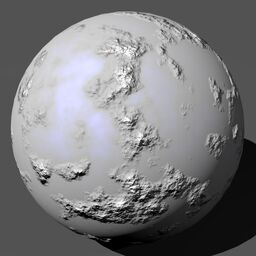
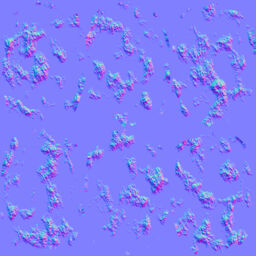
A normal map modifies the normals of the surface. This creates "artificial" bumpiness/roughness and can be used to make a model look more detailed: |
A normal map modifies the normals of the surface. This creates "artificial" bumpiness/roughness and can be used to make a model look more detailed: |
||
| − | [[File:Shader n.jpg|centre|thumb|256x256px]] |
+ | [[File:Shader n-0.jpg|centre|thumb|256x256px]] |
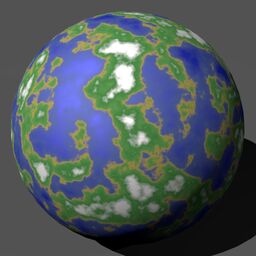
The diffuse and normal map together look like this: |
The diffuse and normal map together look like this: |
||
| − | [[File:Shader dn.jpg|centre|thumb|256x256px]] |
+ | [[File:Shader dn-0.jpg|centre|thumb|256x256px]] |
| − | |||
=== Specular Map === |
=== Specular Map === |
||
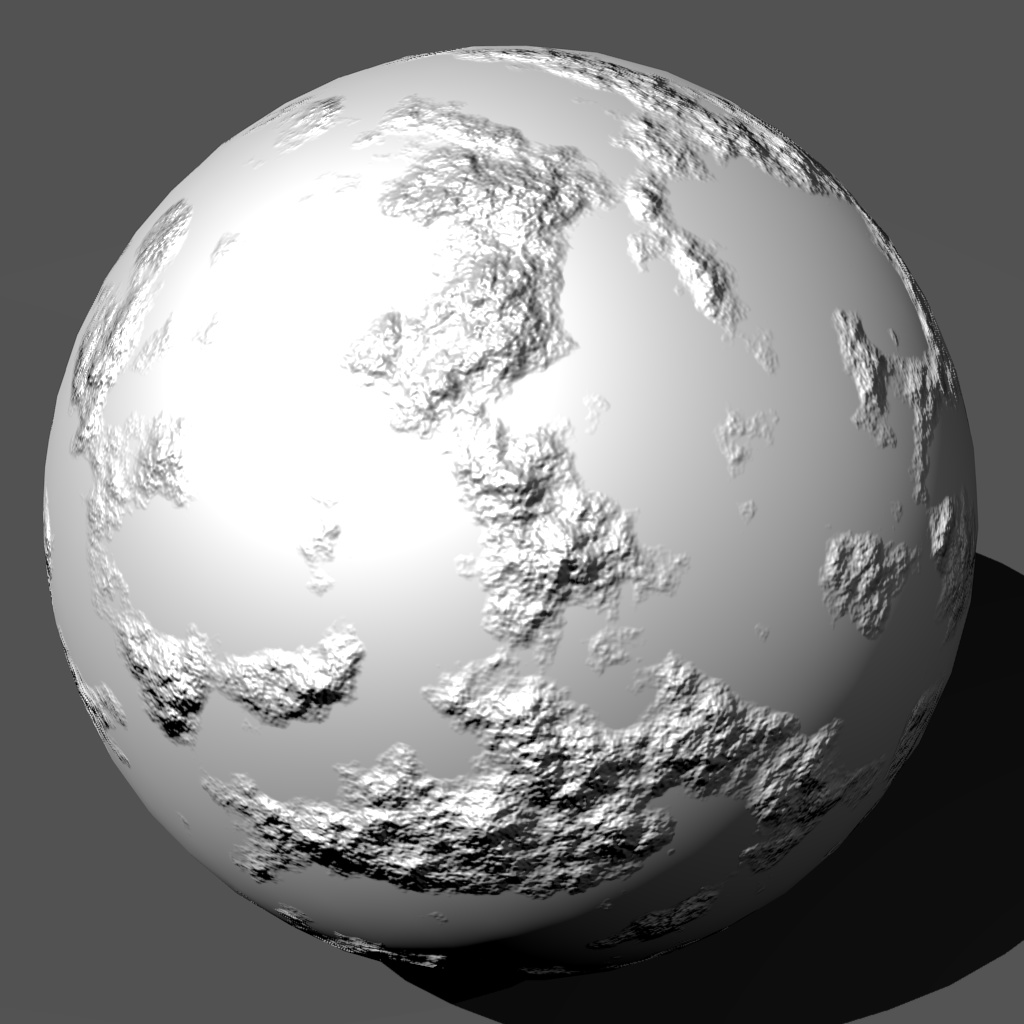
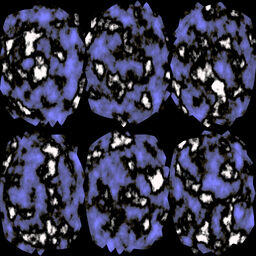
The specular map modifies the specularity (light reflection) of the surface: |
The specular map modifies the specularity (light reflection) of the surface: |
||
| − | [[File:Shader s- |
+ | [[File:Shader s-1.jpg|centre|thumb|256x256px]] |
| − | I gave the "water" of this "planet" a bright blue and the green land mass a dark green-grey. Bright means high reflectivity and dark means low reflectivity. |
+ | I gave the "water" of this "planet" a bright blue and the green land mass a dark green-grey. Bright means high reflectivity and dark means low reflectivity. There seems to be no way in Blender to further increase the specularity without making the light(s) brighter, so this is done later via Urho material. |
| − | [[File:Shader dsn- |
+ | [[File:Shader dsn-1.jpg|thumb|256x256px]] |
| − | [[File:Shader ds- |
+ | [[File:Shader ds-1.jpg|left|thumb|256x256px]] |
| − | [[File:Shader sn- |
+ | [[File:Shader sn-1.jpg|centre|thumb|256x256px]] |
Combinations from left to right: Diffuse+Specular, Normal+Specular, Diffuse+Normal+Specular. |
Combinations from left to right: Diffuse+Specular, Normal+Specular, Diffuse+Normal+Specular. |
||
| + | |||
| + | Here is another example: http://vincent-gros.com/wp-content/uploads/2012/07/RockFloor07.jpg (found at http://vincent-gros.com/category/portfolio/3dgallery/personalwork/) |
||
== Urho3D Techniques == |
== Urho3D Techniques == |
||
| − | Urho3D 1.32 |
+ | Urho3D 1.32 comes with these technique files: |
[[File:Techniques.png|centre|thumb|925x925px]] |
[[File:Techniques.png|centre|thumb|925x925px]] |
||
| − | * "NoTexture" means no |
+ | * "NoTexture" means no diffuse texture (solid color or vertex color). |
* "Unlit" means not affected by light. |
* "Unlit" means not affected by light. |
||
* "VCol" is vertex color. |
* "VCol" is vertex color. |
||
* "Add" and "Multiply" is often used for particle effects like fire or smoke and means that the material does not replace the background color but is added/multiplied with it. |
* "Add" and "Multiply" is often used for particle effects like fire or smoke and means that the material does not replace the background color but is added/multiplied with it. |
||
| + | * "Mask" means that transparent textures generate correct shadows by making shadows when the alpha is >0.5 and no shadow when <0.5: [[File:Urho detailed shadows.jpg|centre|thumb|400x400px]] |
||
[TODO: explain the shipped techniques better HELP NEEDED] |
[TODO: explain the shipped techniques better HELP NEEDED] |
||
| ⚫ | Baking and saving the three Maps in Blender results in the following images, which are later used as textures in Urho3D (Note: Urho3D does not load progressive JPEGs, which is default setting in GIMP). They have been converted to JPEGs with 90% quality to reduce the file size from >4MByte to around 1MByte. The UV map has been created via "Smart UV Project" with "Angle Limit"=66 (default), "Island Margin"=0.03, "Area Weight"=0 and with "Correct Aspect". |
||
| − | [TODO: upload the example "planet" here, export it to Urho to show its appearance inside Urho compared to the Blender renderings and explain how to modify the material.xml to use the different techniques.] |
||
| ⚫ | |||
| ⚫ | |||
| ⚫ | Baking and saving the three Maps in Blender results in the following images, which are later used as textures in Urho3D. They have been converted to JPEGs with 90% quality to reduce the file size from >4MByte to around 1MByte. The UV map has been created via "Smart UV Project" with "Angle Limit"=66 (default), "Island Margin"=0.03, "Area Weight"=0 and with "Correct Aspect". |
||
| − | |||
| − | [TODO: Add a Blender tutorial, that explains those game related things like baking, and put a link here.] |
||
| − | [[File:Planet specular.jpg|thumb|256x256px]] |
||
| ⚫ | |||
| ⚫ | |||
== Appearance in Urho3D == |
== Appearance in Urho3D == |
||
| ⚫ | |||
| − | [TODO: Update the images above to fit this modified settings] |
||
| − | |||
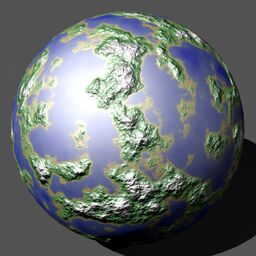
| ⚫ | |||
[[File:Urho planet-1.jpg|centre|thumb|520x520px]] |
[[File:Urho planet-1.jpg|centre|thumb|520x520px]] |
||
The material.xml: |
The material.xml: |
||
| Line 55: | Line 51: | ||
<parameter name="MatSpecColor" value="5 5 5 10"/> |
<parameter name="MatSpecColor" value="5 5 5 10"/> |
||
</material> |
</material> |
||
| − | The MatSpecColor has been manually increased from 1 1 1 10 to 5 5 5 10 to make it brighter. The rest has been automatically set by the Blender exporter. The four values mean |
+ | The MatSpecColor has been manually increased from 1 1 1 10 to 5 5 5 10 to make it brighter. The rest has been automatically set by the Blender exporter. The four values mean red, green, blue, and hardness. |
| + | |||
| + | === Urho Gallery === |
||
| ⚫ | |||
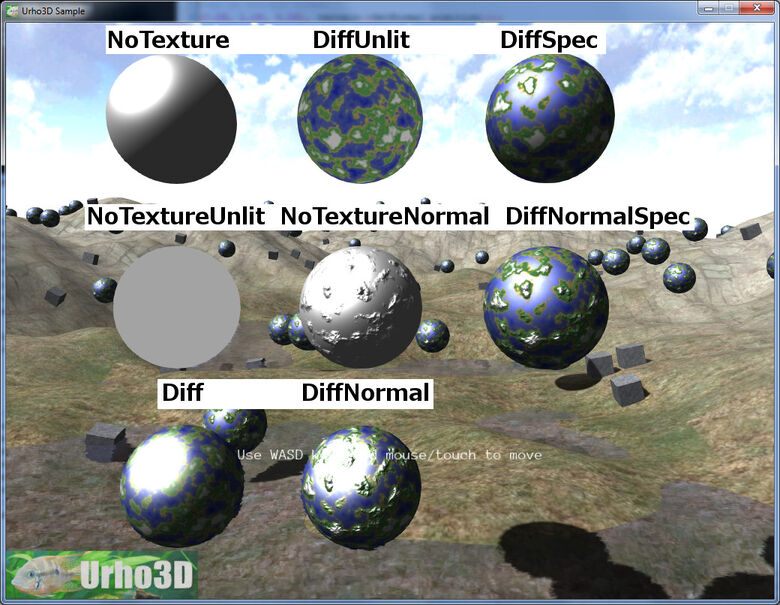
| + | Some of the Urho techniques applied to the planet. Each material file has only the name of the technique changed, like "Techniques/DiffNormalSpec.xml" to "Techniques/NoTextureNormal.xml". The name above each planet is the technique file name (minus ".xml"). |
||
| − | [TODO: Add |
+ | [TODO: Add examples of materials with alpha and Add/Multiply techniques.] |
Latest revision as of 08:32, 20 March 2015
The Basics[]
The Urho3D techniques can be found under "CoreData/Techniques/".
Their name is basically a combination of their features.
A Model without any texture or special effect looks like this (these images here have been rendered with Blender):

Diffuse Map[]
A diffuse map is a typical texture (image) which modifies the color of the surface:
Normal Map[]
A normal map modifies the normals of the surface. This creates "artificial" bumpiness/roughness and can be used to make a model look more detailed:
The diffuse and normal map together look like this:

Specular Map[]
The specular map modifies the specularity (light reflection) of the surface:

I gave the "water" of this "planet" a bright blue and the green land mass a dark green-grey. Bright means high reflectivity and dark means low reflectivity. There seems to be no way in Blender to further increase the specularity without making the light(s) brighter, so this is done later via Urho material.


Combinations from left to right: Diffuse+Specular, Normal+Specular, Diffuse+Normal+Specular.
Here is another example: http://vincent-gros.com/wp-content/uploads/2012/07/RockFloor07.jpg (found at http://vincent-gros.com/category/portfolio/3dgallery/personalwork/)
Urho3D Techniques[]
Urho3D 1.32 comes with these technique files:

- "NoTexture" means no diffuse texture (solid color or vertex color).
- "Unlit" means not affected by light.
- "VCol" is vertex color.
- "Add" and "Multiply" is often used for particle effects like fire or smoke and means that the material does not replace the background color but is added/multiplied with it.
- "Mask" means that transparent textures generate correct shadows by making shadows when the alpha is >0.5 and no shadow when <0.5:

[TODO: explain the shipped techniques better HELP NEEDED]
Baking and saving the three Maps in Blender results in the following images, which are later used as textures in Urho3D (Note: Urho3D does not load progressive JPEGs, which is default setting in GIMP). They have been converted to JPEGs with 90% quality to reduce the file size from >4MByte to around 1MByte. The UV map has been created via "Smart UV Project" with "Angle Limit"=66 (default), "Island Margin"=0.03, "Area Weight"=0 and with "Correct Aspect".


See also: http://urho3d.wikia.com/wiki/Blender_Techniques
Appearance in Urho3D[]
This is the planet with Diffuse, Normal and Specular Map:
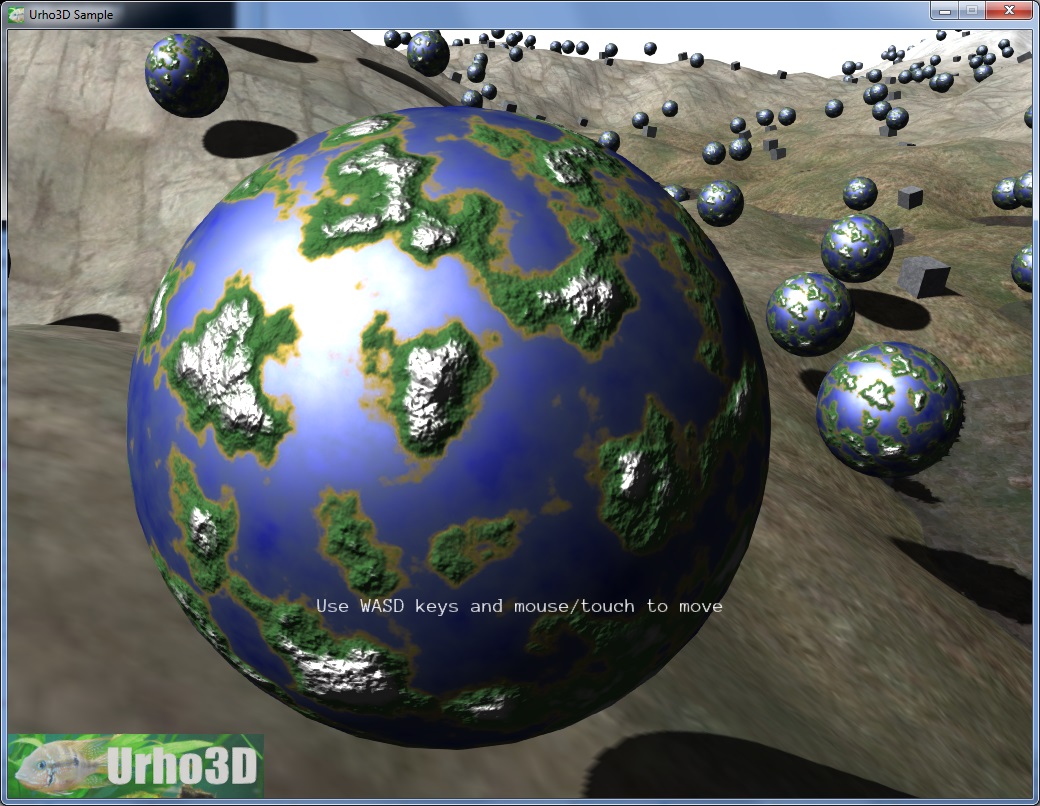
The material.xml:
<material>
    <technique name="Techniques/DiffNormalSpec.xml"/>
    <texture name="Textures/planet_diffuse.jpg" unit="diffuse"/>
    <texture name="Textures/planet_normals.jpg" unit="normal"/>
    <texture name="Textures/planet_specular.jpg" unit="specular"/>
    <parameter name="MatDiffColor" value="0.64 0.64 0.64 1"/>
    <parameter name="MatSpecColor" value="5 5 5 10"/>
</material>
The MatSpecColor has been manually increased from 1 1 1 10 to 5 5 5 10 to make it brighter. The rest has been automatically set by the Blender exporter. The four values mean red, green, blue, and hardness.
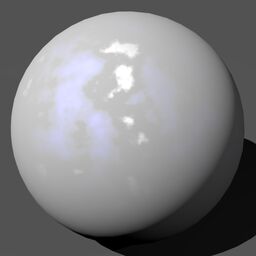
Urho Gallery[]

Some of the Urho techniques applied to the planet. Each material file has only the name of the technique changed, like "Techniques/DiffNormalSpec.xml" to "Techniques/NoTextureNormal.xml". The name above each planet is the technique file name (minus ".xml").
[TODO: Add examples of materials with alpha and Add/Multiply techniques.]